Showing posts with label Parties. Show all posts

Thursday, May 24, 2012

Candy Shoppe Party


For Ella's 1st Birthday, I thought it would be fun to do a "Candy" themed party.  I had a lot of fun fusing my ideas with those that I found on the internet.  I always start with a couple of details and the rest of the party sort of takes shape from there.   In this case, there were so many elements that I had in mind, that all I really had to do was find a common thread to tie them all together.  I think it was sticking with the bright pink color to incorporate everything.  I found these great vinyl table cloths on clearance at Target for about $1.50 each.  I loved them, and they were perfect for the old fashioned candy shoppe that I had in mind.  I spent most of my time working on details for our sweets table.


For this, I spent quite some time making the decorations.  I used my Mom's die-cut machine to make the "Ella's Sweet Shoppe" sign.  Above that I hung candies that I made using foam balls and tulle with ribbon to tie the ends.  To line the path walking up to our house, and on the wall behind the table, I made big lollipops.  I used two plates, stapled them together and covered them in colorful tissue paper and tied the ends with curling ribbon.  I inserted a long dowel, and wala! they were lollipops!  The little white boxes were lined with tissue paper, and they were for the children to fill up with sweets.  I also included a jar of colorful toothbrushes that I found at the dollar store-to keep those baby teeth clean! I found cute cones at my craft store, and wanted to figure out a creative way to use them.  I decided that filling them with cotton candy would be perfect!  I found the top of a box, and cut holes in it to make spots for the cones to sit in.  I was so happy with how my sweets table came out! 


Cakes and cupcakes were easy to make for this party, and still looked adorable! Ella's smash cake was chocolate, and iced in pink (canned) frosting.  I used gel colors to make the dots on her cake, and placed the little swirl lollipops on top.  The cupcakes were also chocolate, and frosted in pink or white.  I used a variety of sprinkles and candies to top these.  I was also thrilled to find brightly colored cupcake liners at my grocery store.  They were perfect!  One thing I really wanted for her party, but did not intend to make was her party hat.  I searched for one to buy online, but was not thrilled with the cost of the hats that I liked.  I decided that I could make one myself.  I purchased a stack of plain hats, cute fabric, a boa, and iron on letters, and went to work.  I used my hot glue gun to adhere the fabric, letters and boa to the hat.   For the cost of about $15 I made my own hat, and had materials left over! (that I have since used again and again!)

This party theme was so much fun, I might even do it again sometime!! 

Happy Candy Shopping! 

-Lindsay


Monday, April 30, 2012

It's a Pirate's Life for Kyle!


For Kyle's 5th Birthday we decided to have a Pirate Party.   Everywhere I looked I was inspired with new ideas for it.  I didn't go overboard with this party in terms of decoration.  My main focus was activities.  This was the first time we were having a party that was comprised mostly of Kyle's own friends.  (still, we somehow managed to have more adults than kids...)  Our main activity, and the one Kyle was most looking forward to, was a Treasure Hunt.  I so badly wanted to do this outside, and was determined to do so.  After all, in upstate New York, by the end of April we can usually expect at least decent weather, if not lovely weather.  The weekend of his party was forecasted to be chilly, but dry.  The night before his party, I decided that yes, we would do the hunt outside regardless of weather.  I spent 2 hours coming up with clues and making treasure maps-everything looking authentic-of course.  Much to my dismay, I woke up to rain, and we had to move everything indoors.  But, as they say, the show must go on.  Lucky for me, the kids were still thrilled with the treasure hunt.  At each stop the children had to perform a "pirate" task in order to earn their pirate gear.  The change from outdoors to in made these tasks a bit challenging-but here they are!

Stop number 1:  Rescue a parrot from a cage.  They had to open up the cage, each rescue one parrot (we used various bird beanie babies for this), and then toss the bird into a bucket, which was "safe".  Once they'd done this, they earned a pirate bandanna, which I made using pirate print fabric.


Stop number 2:   Swim through Mermaid Tunnel.  We have a light blue tunnel, so I put some of our mermaid friends around it, and had them "swim" through on their tummys.  Once they completed that, they earned an important piece to their pirate wardrobe-their eye patch!

Stop number 3:  Walk the plank! This was fun, and really easy.  It was the one game I was able to bring inside that I had planned for outside.  I had purchased a piece of  scrap wood from our hardware store for $1, and painted "Walk the Plank" on it. Once they did that, they were given their final clue to go search for the sword which was needed for:

The Treasure Chest Pinata!!


We even had a pirate to guard the treasure! The kids each had a turn with the (plastic) sword to try and break into that treasure chest.  I even took a whack at it, with no luck!  It was a lot of work, but the kids loved it!  The treasure chest was filled with gold coins, golden jewels, stickers, ring pops, bracelets and various candy all wrapped in gold.  The kids dug right in, just like real pirates!! 

For food for the party, I made "grub bags" for each of the kids.  In each bag, there was a sunbutter and jelly sandwich (safe for our friend with a peanut allergy), a pouch of apple slices, a pouch of goldfish, and a juicebox.  For the table I made a mast and sail, and each spot had a pirate activity placemat.  


Even though I hit a few road blocks while setting up for this party, everything went off without a hitch.  Kyle loved having all his friends there, and they all had a great time! 

Happy 5th Birthday to my sweet little Pirate! Wow, how time flies! 

-Lindsay 


Thursday, April 26, 2012

Sunshine Party for "One"

First birthday parties are fun for me because I get to pick the theme.  Babies aren't really "into" characters yet, and don't really care what the cake looks like, or who you invite.  For Lily's first birthday, I chose a "sunshine" theme.  I love singing "You are my Sunshine" to her, like my parents and grandma sang to me... and I actually got the idea for our blog title while planning her 1st birthday party.

  Recognize this brand new "sunshine" baby... only 5 days old in this picture, born the same day as Lily, 1 year and 30 minutes later!  Carlyn, at her first party!!


I had so many ideas for this cake, and ended up doing this VERY simple cupcake/cake from Martha Stewart's website.  She made a Sunflower cupcake cake, and I just adjusted the decorations slightly, to make it a sun, instead of a sunflower:) 

The little circles above I made using the computer, and hung them across the ceiling, near the windows.  There was one "sun" for each month of her first year.  You can see below on the table, I attempted to keep the food in a "yellow/orangey" color theme.  Nothing too crazy, because cooking scares me way more than baking.  In the kitchen we had a sub tray.  It wasn't allowed on the yellow table, because it did not match :) 

On a side note, I looked EVERYWHERE for a yellow party dress.  I couldn't find one that I liked anywhere, until I stumbled across this little outfit at Target!  I love Target!
Happy Sunny-day! -Erin

Tuesday, April 17, 2012

Cow-GIRRRLLLL Party


Ella was seriously into Toy Story prior to her second birthday. For her party, I wanted to incorporate her love of all things "Ka-bee" (or Cowboy/Woody-to non-Ella speakers), but also her love of all things fancy. Enter-Ella's Cowgirl Party! I found a pair of adorable pink cowboy boots and a pink tutu for her to wear, and I went from there with her party theme. This party has been my favorite to create, as I found a lot of great ideas, and was able to really personalize them to my taste!

Next on my to-do list was the cake. I knew I wanted a cake covered in cow spots. I decided to make a double layer 8" cake. I filled the cake with buttercream frosting made from scratch, and then frosted it in the same buttercream. (this was before I knew to fill cakes with pudding-YUM!) I tinted some of the buttercream pink, and piped that around the bottom of the cake with a star tip. Next up was the fondant. I purchased pre-made fondant and tinted it brown. I then rolled it out, and cut out cow spots with a sharp knife. I laid them carefully on the cake, and was really pleased with the way it turned out. The cake was still missing something, so I decided to make a cowboy hat, and the number 2. To make the hat, I rolled out 2 circles of pink fondant and one strip of the brown fondant. I carved a small divet into the top of a large marshmallow, and covered the marshmallow in buttercream. Then I covered it with one of the pink circles. I then placed the pink covered marshmallow on top of the other pink circle, and added the brown strip around the base of that hat. I curled up the sides of bottom circle. When I was finished, I was impressed that it actually looked like a hat! (all that time watching cake shows on TV paid off!) To accompany my cake, I made about 40 chocolate cupcakes and frosted them with pink buttercream, and topped them with brown sprinkles-cute and easy-peasy!


For decoration, I used several paper lanterns in pink and white, and hung them from tree branches with ribbons. I also made a few signs with pictures of Ella, and added some cute "cowgirl" sayings using Picasa and Picnik. My favorite sign was this one below. I blew it up to an 18x24 print, put it on foam core, and added a long dowel. I tied ribbon around it and stuck it in one my hay bales.


We used the hay bales as seating for the kids, but they made for a great place for a photo op too! We even got a picture of our pug, Jax!


In order to keep with the theme, I wanted to serve Cowboy grub. We had pulled pork sandwiches, corn on the cobb, baked beans, mac and cheese and corn bread. I ordered the pork from our grocery store, and was able to make the rest in advance, so that I was able to enjoy the party and not have to worry about the food! I also made some "smore's on a stick" using marshmallows, chocolate, graham crackers(or sometimes sprinkles) and lollipop sticks. The kids loved them! I didn't plan for any games at this party because Ella was only 2, and not into that yet. The day was beautiful, and we just enjoyed spending time with our family and friends!


-Momma of a Cowgirl, Lindsay

Friday, April 13, 2012

Dinosaur Par-Tay

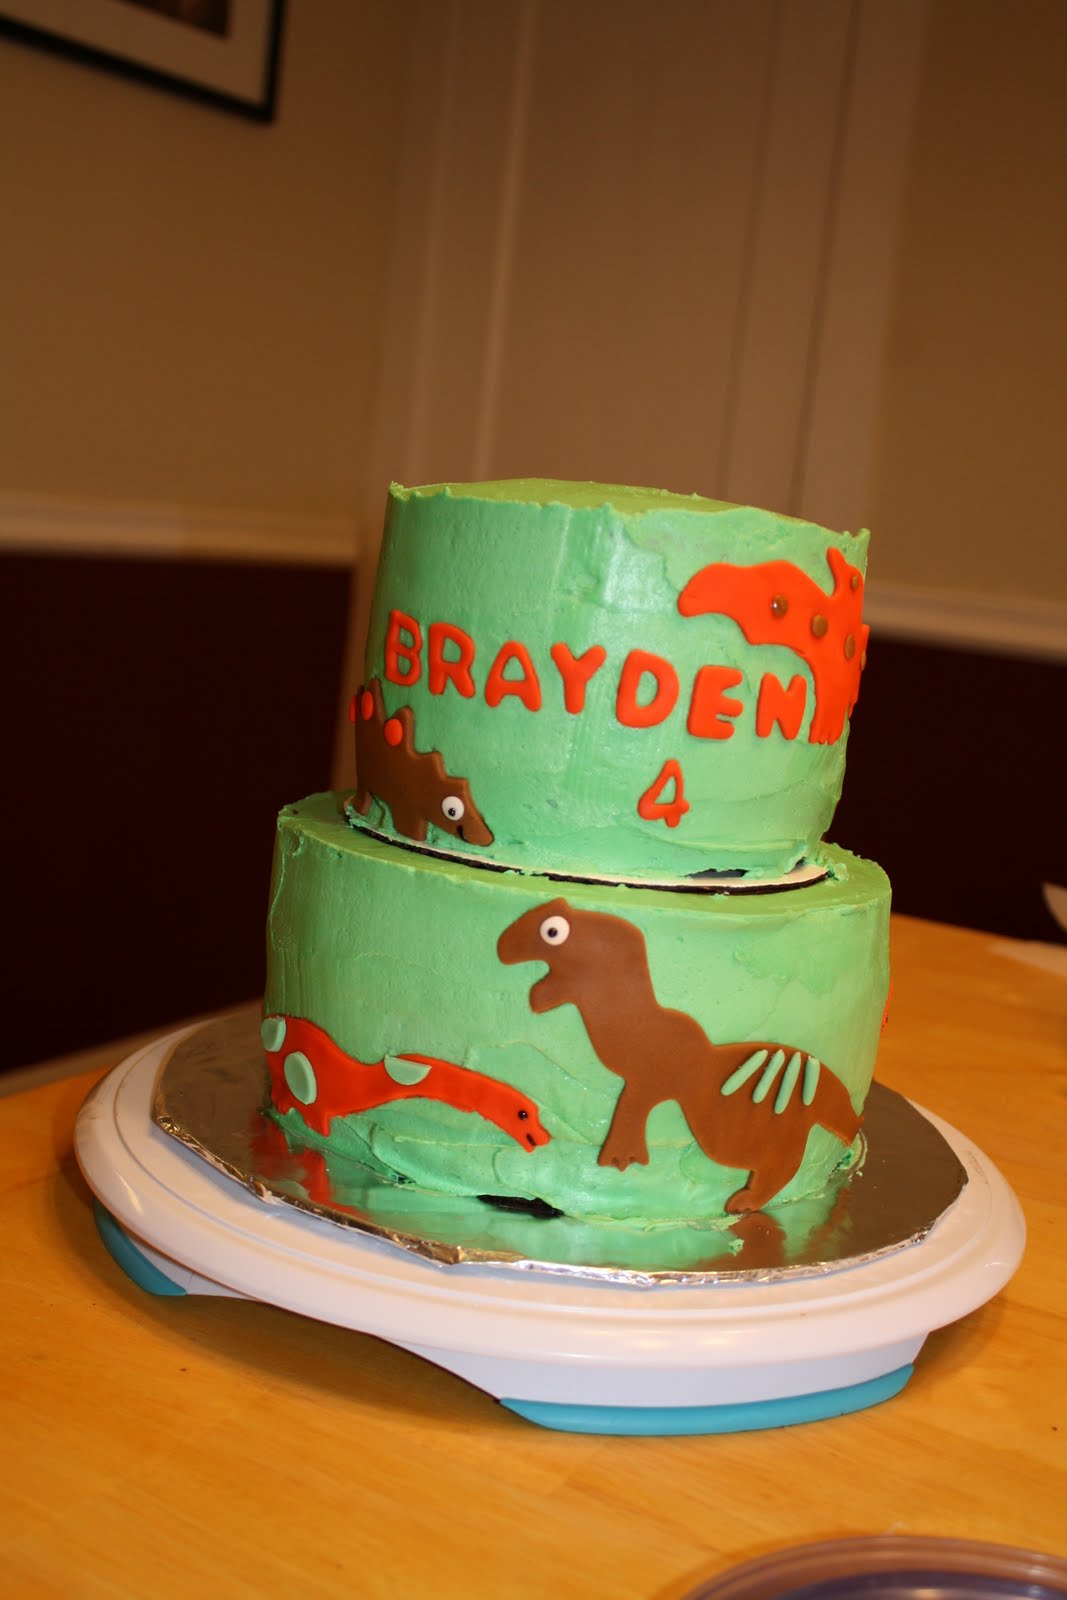
dinosaur cake
After a full year of dinosaur obsession, Brayden decided he wanted to have a dinosaur themed party for the big #4!  Shocking!!!  Now... Brayden doesn't have a favorite dinosaur show, or even dinosaur.  He just loves all things dinosaur.  He loves big scary dinosaurs, small baby dinosaurs, dinosaur eggs, dinosaur fossils, dinosaur nests... you get the idea.  So, that gave me a lot to work with, and of course, I wanted to try to incorporate everything.  Again, I always like to start with my cake idea, and go from there.  I do a lot of buttercream cakes, although I LOVE the look of fondant, I hate the fact that most people peel it off, don't eat it, and toss it in the garbage.  I know I do!  So, I've been practicing a lot, on making smooth buttercream cakes.  It's an obsession.  I think I did O.K. on smoothing the dinosaur cake, but I could have done a lot better. Below are a few pics of my dinosaur cake creation process.  This was a total of 3.5 hours.
 For the bottom of the cake I used 9 inch cake pans, and created 3 layers filled with chocolate pudding.  I leveled the top of the cake, stacked and iced.  The cake was from a box, the buttercream was from scratch.
just keep icing

I made the top layers of the cake using a 6 inch cake pan.  This was also 3 layers.  I used a 6 inch round cake board, and straws I made Scott take from Starbucks, to support the cake.  (Starbucks has great straws, they are thick, and do not bend).  You can see the cake board in the above picture, but eventually it was covered with icing.  There are 4 straws under the board, going through the bottom cake to support the top layer. 
After icing the cake, and used ABC fondant cutters, to make his name out of bright orange Wilton fondant.  Because the buttercream was fresh, the fondant letters stick right to it. 

 I made the dinosaurs with fondant too.  I cut the fondant with dinosaur cookie cutters, and added some fondant spikes, spots and eyes.

The volcano was the final piece.  I just used a small pyrex backing dish and when the cake was cooled, I cut around the top to make it rounded like a volcano.  Red buttercream piped down the sides to look like lava. 


We held this party at a local park building.  The picture above, is a dinosaur "cave" with a nest inside.  The cave is streamers hung from rope.  Inside the cave is the nest made from long pieces of brown packaging paper.  There are spotted balloon dinosaur eggs and blow up dinsaurs.  ROAR!

dinosaur nest and eggs
tar pit!

To get into the dinosaur cave, we played a game where they had to jump over the "tar pit". Scott tossed dinosaur egg balloons out, and the kids had to run around and retrieve them, without falling into the pit!
kids running around collecting the dinosaur eggs!

I also created small dinosaur eggs, follow this recipe but instead of usIing coffee, I used dirt.  If you use too much water they will take a really long time to dry out...like days, so give yourself plenty of time.  At the party we hid the eggs, the kids had to find them, and then hammer them open to find the small plastic Dollar Store dinosaur inside.  This activity was a huge hit with the littles!!

finding dinosaur eggs
smashing them open!
I tried to make the food dinosaur themed too.  We had dino shaped chicken fingers, dino shaped PB&J sandwiches (made by daddy), and colors of food that matched the party.  The banner I made with scrapbook paper, dinosaur die-cuts, and letters printed of a Word document. 


dino nuggets

dino PB&J

Happy Dino-sauring- Erin

Wednesday, April 11, 2012

Choo Choo Train Party

For Brayden's 3rd Birthday, he was really into Thomas the Train.  He carried his little trains around all day, and loved to play on his train table.  We decided to have his party at the YMCA, and I provided the pizza and cake.  This cake was inspired by a Better Crocker video I found online. 


I made a little kids table, with name cards and a small gift.  This was the first party we'd had at a location other than our home.  The play area was definitely a hit with the kids.  Much less prep time, and way less stress.  Why don't I do this with every party?  I enjoy the challenge:)
Front of train, and the train cupcake
I made the front of the train using peppermint patties for wheels, reeces cups and a candy kiss for the smoke stack, and tootsie rolls for coal.  The lights are gum drops, and some kind of gummy candy to decorate the front.  Pretzels make the train tracks.

Animal car


gummy bear car

M&M car

Back to the cake... I made the cake after watching this video for creating a Train Cake on the Better Crocker website.  It was not that difficult to make.  I made it before I had taken any cake classes.  Simple, right!

Look at my cute little helpers!!
the production!

birthday helper

Happy Choo-Choo-ing- Erin

Monday, April 9, 2012

A Princes Birthday Party- 'Tangled' Style

I love to throw parties. I love the look on the faces of the people I love when they are enjoying the festivities. However, parties stress me out! Getting things the way I want them, while not spending a trillion dollars on decorations I'll never use again, is my goal. This year, Lily has been into Disney's version of Rapunzel...Tangled! We watch this movie so often that even my husband, the silent observer, has several parts and songs memorized. This is mostly for my entertainment, but I digress, more on the Tangled party. My first inspiration is always the cake. I took a few cake classes at Michael's art store, and now have the false impression that I can take on any cake I see in a picture on the Internet when I search "cute party cakes" or "creative idea's for cakes" This, however is not the case! I found a few pictures online, but nothing that I loved. So I took a few idea's and put them together to create my "masterpiece" This is a strawberry and chocolate cake, covered with traditional buttercream. The flowers were piped using Royal icing, and the "braid" is white fondant, painted with golden luster dust.
 
the table

bagel tower

The banner

hot dogs and braided crescent rolls

muffins, donuts, dipped oreo's
The party wall.  The banner.  The hanging things.  The pictures.  The table.  These are all essential elements to a good "theme" party.  When my kids were babies, I always said there would be no character parties, princess parties, nothing too "themey."  Well, that's what they want!  Duh!  So I try to do "themey" without being too "themey." I like to pick the character's they LOVE, but try not to buy the matching plates, napkins, banners, treat bags, pencils, party hats, table cloth...did I miss anything?  There is nothing wrong with doing that, it just gets expensive quickly, and I like to try to be more frugal, and crafty, or something like that...

Flynn Rider "climbing" the hair
Another important part of the movie is her hair, of course!  The party needed hair.  I saw a lot of pictures online of people drapping the hair around their house using yarn.  Sounds simple enough!  No, this was the longest project ever.  I bought yarn and flowers and yellow streamers and bows.  I laid the yarn out across my foyer, living room and into my dining room, and cut.  Then I had to repeat this step... like 100 times!  Once the "hair" was cut, I felt I had successfully created her hair, however, it was on my floor, not hanging in delicate tendrils across my home's interior.  I quickly realized that "Tangled" party would be an understatment if I didn't figure out how to move my "hair" without making a huge twisted pile of yarn.  Twist ties!!!!!  Every few feet, I knotted a twist tie.  This helped minimize tangling, and also help with the transfer.  Scott, the lucky assistant, got to help me hang the hair strategically across the foyer, into the living room and down the wall.  We added Flynn Rider, as a final touch.  Genious:)

paper lanterns
I felt that the party should have lanterns.  If you've seen the movie you'll know, that Rapunzel see's the lanterns from her tower every year on her birthday, but she doesn't know what they are.  In her adventures she discovers that they are floating lanterns set off every year, to remember the lost princess.  I needed lanters!  They were essential...off to google "paper lanterns" :)  Here's what I came up with! 12x12 inch scrapbook paper, folded, cut, and hung for all to enjoy!


Let's just eat some cake! Happy 2nd Birthday, Lily!

Happy Tangling- Erin